 G 8 G M U |
|
|
This is another quick and easy 'get you going' antenna, with minimum cost and only basic technical & DIY expertise required.
It is useful in the smaller garden or for those requiring minimal visual impact.
No originality is claimed for this antenna & please be sure you are competent before undertaking construction. Beware I have only made 2 of these, they worked well for me, but all antenna's do not always work well for all. I only found around one S point gain between using this mast down at 3 metres of the ground to raising it 14 metres in the air.
It is intended to be used horizontal the direction of radiation is opposite the feed point.
Each side of the antenna is 14 feet long the feed point is 14 feet + the distance of the insulator. I used bell wire or as the U. S. folk call it hook up wire. 4 x14 = 56 plus another foot for comfort in making off the ends & going round the corners.
The spider or spreader across the diagonal is 14 feet x root 2 = (in round figures) 19.8 feet, I suggest for comfort & setting up make it 20 feet & cut off the surplus.To attach it to my Pneumatic mast I use a block of thick marine ply with a hole in the centre to allow the mast stub entry, the sandwiched it with a clamp above, the being adequate due to it's light weight & low wind resistance. I also added a piece of cane to support the ribbon feeder about 3 feet in front of the feed point.
Method of construction
Make up your spider / spreader from timber, heavy cane or fibre glass poles, it essential to set each at right angles to the next.. Having produced the spider set out 4 dog bone insulators, firmly but not finally attaching them to the positions on the spider to describer the 14 foot square. Strong elastic bands are ideal for this.
Secure one end of your wire to a dog bone or similar insulator, pass the free end through the insulators on the spider. Make a temporary knot at the feed point dog bone. The feed point is central along its edge. Adjust the 4 insulators to set out the 14 foot square making the wire element as tidy & square as possible. You may need to secure each corner with a cable tie
Attach the ribbon feeder, I strongly suggest soldering. seal the joints with candle wax, liquid rubber or tape with self amalgamating tape. Take the feed over the top of the spider put there to support the feeder.
The antenna now ready to test this. being a loop it is a short circuit to DC so the usual ohmic check will only confirm you have continuity, it may be wise to do this.
Attach the feeder to the balanced output of your ATU and in accordance with your licence conditions have fun.
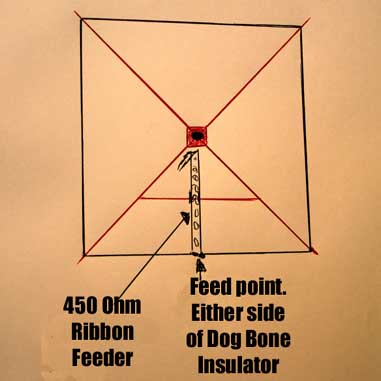
The red lines indicate the support part of the antenna.
The black lines the feeder & 'elements'.
The spider or spreader across the diagonal is 14 feet x root 2 = (in round figures) 19.8 feet, I suggest for comfort & setting up make it 20 feet & cut off the surplus.To attach it to my Pneumatic mast I use a block of thick marine ply with a hole in the centre to allow the mast stub entry, the sandwiched it with a clamp above, the being adequate due to it's light weight & low wind resistance. I also added a piece of cane to support the ribbon feeder about 3 feet in front of the feed point.
Make up your spider / spreader from timber, heavy cane or fibre glass poles, it essential to set each at right angles to the next.. Having produced the spider set out 4 dog bone insulators, firmly but not finally attaching them to the positions on the spider to describer the 14 foot square. Strong elastic bands are ideal for this.
Secure one end of your wire to a dog bone or similar insulator, pass the free end through the insulators on the spider. Make a temporary knot at the feed point dog bone. The feed point is central along its edge. Adjust the 4 insulators to set out the 14 foot square making the wire element as tidy & square as possible. You may need to secure each corner with a cable tie
Attach the ribbon feeder, I strongly suggest soldering. seal the joints with candle wax, liquid rubber or tape with self amalgamating tape. Take the feed over the top of the spider put there to support the feeder.
The antenna now ready to test this. being a loop it is a short circuit to DC so the usual ohmic check will only confirm you have continuity, it may be wise to do this.
Attach the feeder to the balanced output of your ATU and in accordance with your licence conditions have fun.
The red lines indicate the support part of the antenna.
The black lines the feeder & 'elements'.
The red lines indicate the support part of the antenna.
The black lines the feeder & 'elements'.